- How the sun-dried tomatoes fable begins
- Step 1: Pick the Perfect Tomatoes—The Foundation of Flavor
- Step 2: Gather Your Tools for Tomatoes to Be Dried
- Step 3: Creating the Perfect Drying Surface
- Step 4: Perfectly Cutting the Tomatoes with Precision
- Step 5: Lay the Tomatoes and Add the Salt
- Step 6: Sunlight and Care—Let Nature Work Its Magic
- Step 7: Turn and Dry—Ensuring a Perfectly Even Finish
- Step 8: The Vinegar Trick—A Touch of Flavor and Purity
- Step 9: Final Sun-Kiss—Preparing for Perfection
- Step 10: Seal the Flavor—Creating Your Culinary Masterpiece
How the sun-dried tomatoes fable begins
At Tomato Fable, every recipe reveals a touch of magic, turning the kitchen into a stage for timeless culinary tales. Just like a cherished fairy tale, the art of making Italian sun-dried tomatoes in oil brings together tradition, flavor and a hint of nostalgia. Here, we celebrate the enchanting journey of food, where humble tomatoes become golden jewels of taste through patience, sunlight, and love. In this story, you’re the protagonist, reviving an age-old tradition and putting a little piece of Italian charm on your table.
In this guide, we’ll take you step by step through the traditional method of preparing organic sun-dried tomatoes with amazing tips and tricks belonging to the technique perfected over generations in the sun-soaked region of Matera, Basilicata. You’ll uncover the secrets of this time-honored practice—a method passed down from ancestors who relied on the sun, the earth, and a pinch of magic to transform fresh produce into flavorful delights. If you’ve ever wondered how to make sun-dried tomatoes with the authentic flair of southern Italy, you’re in the right place.

When it comes to Italian cuisine, the magic lies in its ability to transform simple, organic ingredients into culinary masterpieces. Among these treasures is the art of crafting sun-dried tomatoes infused in olive oil — a process steeped in history, passion, and time-honored tradition.
Please note that as for all homemade foods, the process is designed to produce artisanal-quality results meant to be shared with family and friends—not for commercial sale or market distribution.
So, let’s step into this flavorful tale, where the sun, tomatoes, and a little touch of Italian magic come together. Learn to preserve the vibrant essence of summer, crafting oil-infused delights that carry the soul of a proud culinary heritage. Let’s bring a piece of Italy’s storybook charm into your kitchen, one delicious step at a time!
Step 1: Pick the Perfect Tomatoes—The Foundation of Flavor

Every great recipe begins with quality ingredients, and for sun-dried tomatoes, the star of the show is undeniably the tomato itself. Head to your garden, farmer’s market, or local store to find the freshest, ripest tomatoes you can. While any variety will work, larger tomatoes like San Marzano or Roma are ideal, as their size helps compensate for the natural shrinkage that occurs during the sun-drying process.
When preparing for this culinary journey, consider these key points:
- Summer is the perfect time for sun-drying tomatoes, as the abundant sunlight and warm temperatures are essential for proper drying. The exact timing may vary depending on your geographical area, so choose the sunniest weeks for the best results. Alternatively, you can always consider drying the tomatoes in an oven at 250°F for 2,5 hours.
- The drying process significantly reduces the tomatoes’ size. Approximately 1 kilogram (2.2 pounds) of fresh tomatoes will yield just 100 grams (3.5 ounces) of sun-dried tomatoes. Adjust the quantity to suit your needs.
Look for tomatoes that are firm, plump, and free of blemishes. The fresher your tomatoes, the richer the final flavor. If possible, choose organic tomatoes to ensure a pure, untainted taste that reflects the beauty of nature. Imagine these juicy gems glistening under the sun, slowly transforming into concentrated bursts of flavor—your journey to Italian tradition starts here!
Step 2: Gather Your Tools for Tomatoes to Be Dried

Before diving into the process, it’s important to assemble the essential tools that will help you craft your sun-dried tomatoes with ease. Here’s what you’ll need:
- Cutting board and a bread knife, perfect for slicing the tomatoes evenly.
- Cloth to clean the tomatoes by removing dust and traces of soil.
- Bowl of salt to enhance flavor and preserve the tomatoes naturally.
- Wooden dryer, an indispensable tool that provides an ideal surface for evenly drying your tomatoes while allowing airflow underneath.
- Elastic cords and a perforated fabric to shield the tomatoes from insects while still allowing sunlight and air to pass through. Common thin and breathable white curtains are a great alternative if you don’t have specialized fabric on hand.
With these simple tools, you’ll be fully prepared to begin your journey into Italian culinary tradition. Lay them out and imagine the transformation ahead—a crate full of vibrant tomatoes becoming concentrated treasures of flavor, all under the warmth of the sun. The stage is set, and the magic is about to begin!

Step 3: Creating the Perfect Drying Surface

Now that your tools are ready, it’s time to set up the wooden dryer, which will serve as the stage for the sun-drying process. Start by covering the bottom side of the dryer with a layer of perforated fabric. This base layer is essential for supporting the tomatoes while allowing proper airflow from below.
Secure the fabric tightly around the edges of the dryer using an elastic cord. Make sure the fabric is smooth and taut especially around the corners to create a protected base for placing the sliced tomatoes later. This simple setup ensures your tomatoes dry evenly and stay protected from contaminants during the process.
Once your wooden dryer is ready, you’re one step closer to transforming fresh tomatoes into delicious sun-dried delights. The next phase is slicing and arranging the tomatoes for their sun-soaked journey!

Step 4: Perfectly Cutting the Tomatoes with Precision

The way you cut your tomatoes plays a crucial role in the drying process, as it ensures even drying and preserves their natural flavors. Follow these steps carefully to prepare your tomatoes for their sun-soaked transformation:
- Clean the tomatoes: Begin by gently wiping each tomato with a clean cloth to remove any dirt or debris. This step ensures that your tomatoes are pristine and ready for processing. (See Picture 1)
- Remove the stalk end: Using your bread knife, carefully cut off the head of the tomato where the stalk was attached. This creates a flat surface and removes any tough or fibrous parts. (See Picture 2)
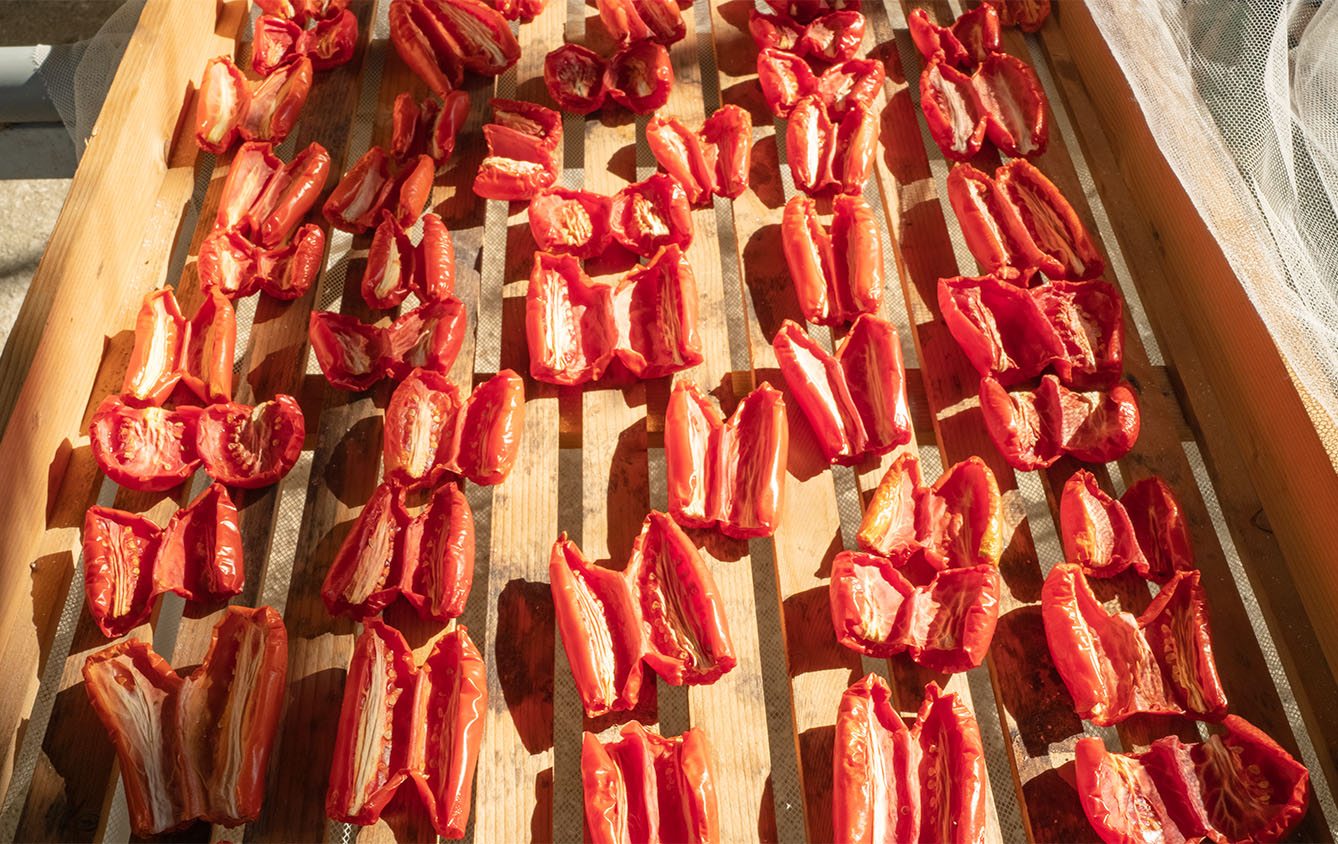
- Slice and ‘open’ like a book: Lay the tomato on its side and make a cut almost all the way through from one end to the other, leaving a small portion uncut to act as a hinge. When done, gently open the tomato so it lies flat, resembling the pages of an open book. This method maximizes the surface area for even drying. (See Picture 3)
With your tomatoes perfectly cleaned and cut, they’re now ready to take their place on the wooden dryer for the next exciting step!


Step 5: Lay the Tomatoes and Add the Salt

With your tomatoes cleaned and perfectly cut, it’s time to arrange them on the wooden dryer. This step is crucial for ensuring even drying and infusing the tomatoes with the perfect balance of flavor and preservation.
- Gently place the cut tomatoes flat on the wooden dryer. Arrange them with the cut side facing up, ensuring they are spread out evenly to allow maximum airflow. Fill the dryer completely but avoid overlapping the tomatoes, as this can hinder the drying process.
- Adda generous pinch of salt over each tomato. The salt draws out moisture, accelerates the drying process, and acts as a natural preservative. Additionally, it enhances the tomatoes’ natural sweetness, giving them that rich, savory flavor iconic to sun-dried tomatoes.
- Once the tomatoes are laid out and salted, cover the dryer with a second layer of perforated fabric or breathable material (such as thin white curtains). Secure this layer with an elastic cord, ensuring the fabric is pulled tight, especially around the corners of the dryer. This protective layer keeps the tomatoes safe from insects and debris while allowing sunlight and air to circulate freely.
Once all your tomatoes are laid out and salted, your dryer is now ready for the next step. The sun will soon work its magic, transforming these humble tomatoes into delicious, oil-ready treasures!


Step 6: Sunlight and Care—Let Nature Work Its Magic

Now that your tomatoes are prepared and secured in the dryer, it’s time to harness the power of the sun to bring out their rich, concentrated flavors. Follow these tips to ensure the drying process goes smoothly and your tomatoes are protected every step of the way:
- Sun exposure during the day: Place the dryer in direct sunlight to allow the tomatoes to dry naturally. During the peak of summer, when the sun is at its strongest, it’s best to expose the tomatoes to direct sunlight only in the early morning and late afternoon. During the hottest hours of the day, move the dryer into the shade to prevent overheating, which can cause uneven drying or damage to the tomatoes.
- Drying time for the upper side: Depending on the weather conditions and ambient temperature, the upper side of the tomatoes will take one to two days of constant sun exposure to begin drying sufficiently. Monitor the progress closely, as environmental factors can influence the drying speed.
- Protect from nighttime humidity: As night falls, bring the dryer indoors or into a covered, well-ventilated space. Humidity is the worst enemy of sun-dried tomatoes, as it can lead to mold growth and ruin the entire batch. Ensuring your tomatoes are shielded from moisture during the night is crucial for their preservation and success.
By carefully managing the sunlight and guarding against humidity, you create the perfect conditions for your tomatoes to dry evenly and safely. Soon, you’ll see them transform into the flavorful treasures that embody the essence of Italian tradition!

Step 7: Turn and Dry—Ensuring a Perfectly Even Finish

Once the upper side of your tomatoes has dried sufficiently under the sun, it’s time to focus on the other side to achieve a uniform texture and flavor. Here’s how to proceed:
- Turn the tomatoes: Gently flip each tomato so that the previously unexposed back side is now facing upward. This ensures that both sides of the tomato dry evenly, preventing any moisture pockets that could spoil the batch.
- Repeat the drying process: Place the dryer back under the sun, following the same guidelines as in Step 6. Allow the tomatoes to dry during the early morning and late afternoon and move them into the shade during the hottest hours of the day to avoid overheating.
- Monitor the drying time: Depending on the weather and environmental conditions, the back side of the tomatoes will usually take about one more day of consistent sunlight to dry completely.
By carefully repeating this drying process, you’ll ensure that every tomato reaches the ideal level of dryness, preserving its flavor, texture, and quality. With both sides perfectly dried, your tomatoes will soon be ready for their final transformation into a flavorful, oil-packed delicacy!
Step 8: The Vinegar Trick—A Touch of Flavor and Purity

Before your sun-dried tomatoes are ready for their final preservation, there’s one simple but incredibly effective step to enhance both their flavor and safety: a quick vinegar wash. This time-tested trick works as a natural disinfectant and infuses the tomatoes with a subtle tangy note.
- Prepare three bowls: Arrange three bowls side by side. Fill the first bowl with your freshly dried tomatoes, the second bowl with vinegar, and leave the third empty to hold the washed tomatoes.
- Soak and rub: Take a handful of dried tomatoes and gently soak them in the vinegar. Rub them lightly to remove any remaining impurities, ensuring they are clean and evenly coated with the vinegar.
- Transfer to the third bowl: Once washed, move the tomatoes into the third bowl, where they’ll rest until all the batches are done.
This quick and simple step not only purifies the tomatoes but also adds a layer of delicious flavor, setting the stage for the next step in their transformation into oil-packed treasures!
Step 9: Final Sun-Kiss—Preparing for Perfection

After washing your dried tomatoes with vinegar, it’s time for a final touch to ensure they’re completely ready for storage. This last round of drying under the sun will help remove any excess moisture from the vinegar wash and prepare them for their flavorful transformation.
- Lay the tomatoes back on the dryer: Arrange the tomatoes on the wooden dryer once again, spreading them evenly with the cut sides facing up.
- Sun-dry each side: Allow the tomatoes to bask in the sunlight for a few hours on each side. As always, consider the temperature and environmental conditions, following the tips from Step 6 to manage sun exposure and avoid nighttime humidity.
- Check for readiness: The tomatoes should feel firm and slightly leathery but not brittle. This final drying ensures they’re perfectly prepped for preservation and prevents any moisture that could spoil the batch.
Once this step is complete, your tomatoes are ready for their final transformation into oil-packed delights with aromatic condiments. The next step is all about storage and flavoring—a true celebration of Italian tradition!
Step 10: Seal the Flavor—Creating Your Culinary Masterpiece

The final step in your journey is turning your perfectly dried tomatoes into a flavorful treasure that’s ready to enjoy for months—or even years. This step captures the essence of Italian tradition, combining the rich taste of sun-dried tomatoes with aromatic herbs and high-quality olive oil.
- Pack the jars: Select clean, dry glass jars of your preferred size. Begin by tightly packing the dried tomato strips inside, layering them evenly to maximize space.
- Add aromatic flavors: Between the layers of tomatoes, sprinkle in a touch of oregano and a few capers. These simple yet flavorful additions enhance the tomatoes’ natural taste and give them an authentic Italian flair.
- Fill with olive oil: Once the jar is filled with tomatoes and herbs, pour in extra virgin olive oil until the contents are fully submerged. Use a spoon or fork to gently press the tomatoes down, removing any trapped air bubbles.
- Seal and store: Close the jars tightly with their lids and store them in a cool, dark place. The tomatoes will continue to absorb the oil and flavors over time, becoming even more delicious.
If you are still curious about recipes and proposals here in Tomato Fable, have a look to our article on how to make delicious cherry tomatoes for storage or also how to make homemade tomato salse!
Your flavor masterpiece is now ready! If the drying process was done successfully, these jars of sun-dried tomatoes can last anywhere from several months to a few years. Enjoy them as a topping for pasta, a complement to cheese, or a gourmet snack straight from the jar—each bite is a testament to the art of Italian culinary tradition.